|
| Continuing past SH 6, even though IH 10 (Katy Freeway) is well within the Houston metro area, Downtown is still another 17 miles away. 08/08/06 |
|
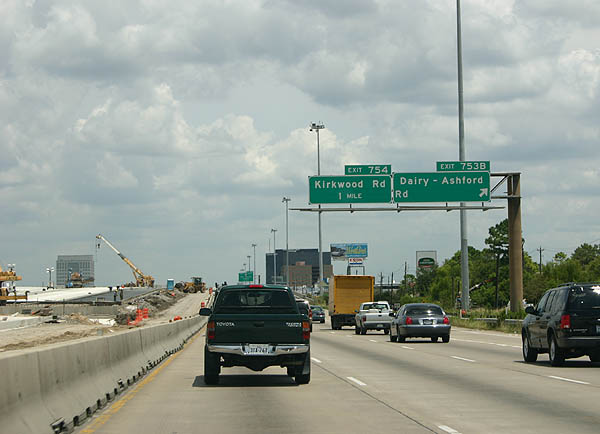
| Exit 753B joins IH 10 with Dairy-Ashford Road. Dairy-Ashford Road runs west into the Spring Branch West area of Houston and south to the Memorial and Briar Forest communities. 08/08/06 |
|
| Advancing east between the Spring Branch West and Memorial areas of Houston, IH 10 reaches the multi level interchange (Exit 756) with the Sam Houston Tollway in two miles. 08/08/06 |
|
| Departing next is Exit 754 to Kirkwood Road south to the Briar Forest and Westchase communities. 08/08/06 |
|
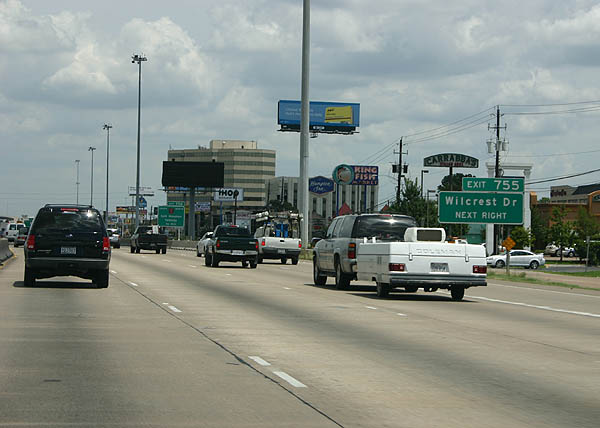
| Exit 755 follows from IH 10 east ahead of Wilcrest Drive and the Beltway 8 frontage roads for the Sam Houston Tollway. 08/08/06 |
|
| The Sam Houston Tollway / Beltway 8 represents the middle of three beltway systems encircling Houston. The 87.84 mile route is mostly tolled, with freeway sections to the north by George Bush Intercontinental Airport (IAH) and east at Channelview 08/08/06 |
|
| The original systems interchange (Exit 756) between IH 10 and the Sam Houston Tollway was built in 1989. Reconstruction of the Katy Freeway in 2006-07 included rebuilding the exchange at Beltway 8. 08/08/06 |
|
| Exit 757 departs from the IH 10 within the stack interchange at Beltway 8 for Gessner Road to Memorial City Mall. 08/08/06 |
|
| IH 10 (Katy Freeway) plies through a heavily developed retail corridor east from Beltway 8 to Memorial City Way and Bunker Hill Road (Exit 758). 08/08/06 |
|
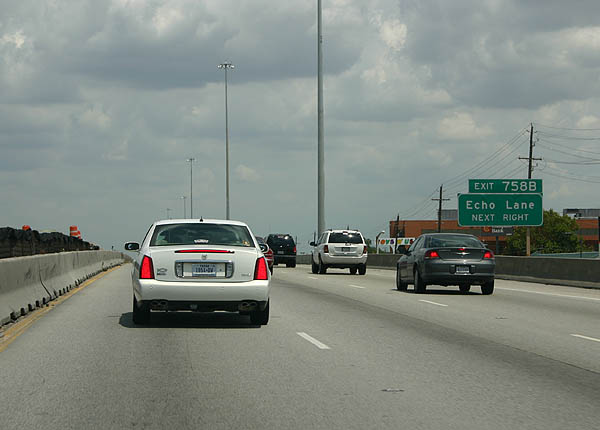
| Exit numbers for the Bunker Hill Road and Blalock / Campbell Road off-ramps were renumbered from 758A/B to 758 and 759 respectively during the reconstruction of the Katy Freeway. 08/08/06 |
|
| Braided ramps follow along IH 10 east ahead of Exit 759 and Echo Lane. 08/08/06 |
|
| Blalock Road extends Echo Lane north from the city of Hedwig Village as an arterial route to the Spring Branch Central neighborhood in Houston. Campbell Road parallels to the east along a three lane boulevard. 08/08/06 |
|
| Exit 760 joins IH 10 (Katy Freeway) east with Bingle Road north to the city of Spring Valley and Voss Road south through the city of Hunters Creek Village. 08/08/06 |
|
| Reconstruction of the Katy Freeway smoothed out a number of "rollercoaster humps" that were common during the building of early Texas freeways. IH 10 next meets Exit 761 for Wirt Road, Chimney Rock Road and Antoine Drive. 08/08/06 |
|
| Exits 761A/B were consolidated into a single departure point from IH 10 eastbound during reconstruction of the Katy Freeway. Wirt Road leads north from IH 10 to the city of Hilshire Village and south as Chimney Rock Road to Greater Uptown in Houston. 08/08/06 |
|
| Antoine Drive comprises a four lane parkway north from IH 10 through the Spring Branch East community of Houston. 08/08/06 |
|
| Exit 762 leaves IH 10 east for Silber Road and Post Oak Road, arterials at Spring Branch East and Greater Uptown. 08/08/06 |
|
| IH 10/U.S. 90 shifts southward through the systems interchange (Exit 763) with IH 610 along an S-curve to Memorial Park. A 37.87 mile long freeway, IH 610 forms the inner beltway of Houston. 08/08/06 |
|
| IH 10 (Katy Freeway) drops below grade by Memorial Park and continues a half mile from a Union Pacific Railroad overpass to Exit 764 for Westcott Street south and Washington Avenue north. 01/15/06 |
|
| The general travel lanes of IH 10 eastbound reduce from six to four at the diamond interchange (Exit 764) with Westcott Street and Washington Avenue. 01/15/06 |
|
| Washington Avenue angles northwest to the Lazy Brook / Timbergrove community and Katy Road (old U.S. 90). Westcott Street forms a one way couplet with Washington Avenue south of IH 10 into the Washington Avenue Coalition / Memorial Park area of Houston. 01/15/06 |
|
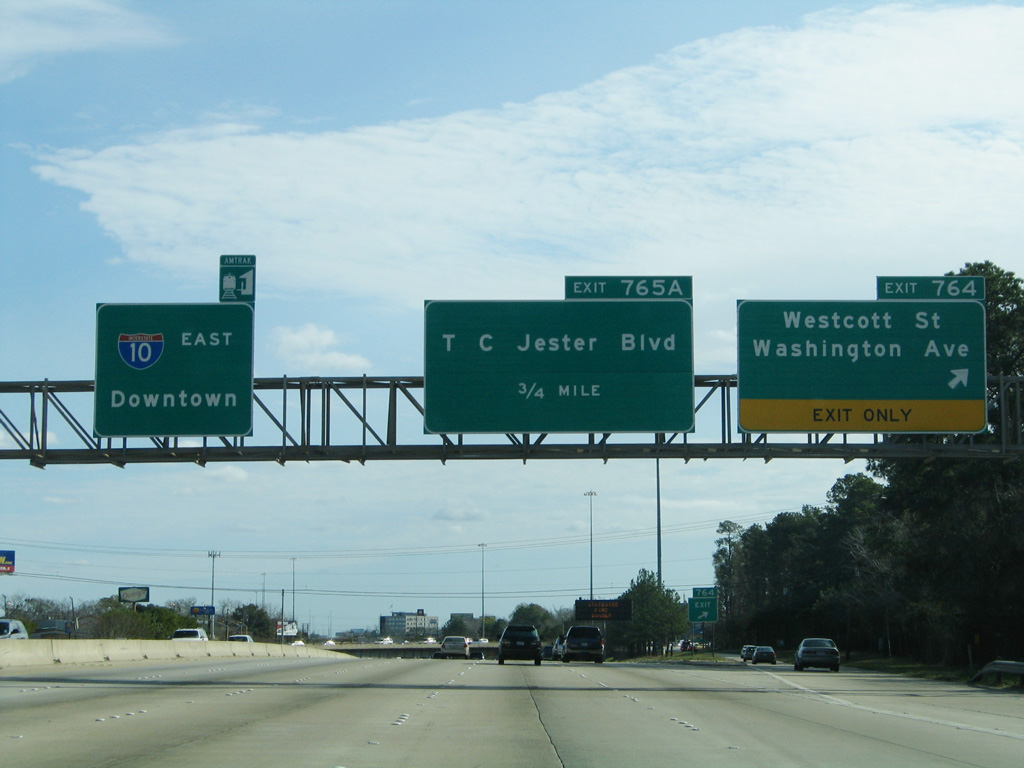
| Another set of UP Railroad lines span IH 10 (Katy Freeway) east ahead of Exit 765A to T.C. Jester Boulevard. 01/15/06 |
|
| Exit 765A departs for T.J. Jester Boulevard north to Lazybrook / Timbergrove and south to Washington Avenue Coalition / Memorial Park. 01/15/06 |
|
| Exit 765B parts ways with IH 10 (Katy Freeway) east below the T.C. Jester Boulevard overpass for Durham Drive, Shepherd Drive and Patterson Street to the Greater Heights neighborhood. 01/15/06 |
|
| IH 10 progresses 2.75 miles east along the Greater Heights community and Exit 765B to IH 45. 01/15/06 |
|
| The below grade section of IH 10 passes under Durham Drive, a third of a mile ahead of Exit 766 to Yale Street and Heights Boulevard. 08/08/06 |
|
| Formerly signed as Exit 767A, Exit 766 departs IH 10 east for Yale Street and Heights Boulevard. Heights Boulevard leads south to a cloverleaf interchange with Memorial Drive and the Neartown-Montrose community. 08/08/06 |
|
| Added to the Katy Freeway in 1991, the east end of the HOV lane connects IH 10 to Downtown without return access to the freeway mainline for points east. 01/15/06 |
|
| Exit 767A separates from IH 10 eastbound for the service road leading to Studemont Street. 01/15/06 |
|
| The HOV lane is a left exit. The elevated roadway extends above the forthcoming IH 10 and IH 45 dual freeway to Franklin Street on the north side of Downtown Houston. 01/15/06 |
|
| Running alongside White Oak Bayou and White Oak Park, IH 10 (Katy Freeway) enters the diamond interchange (Exit 767B) with Taylor Street. 01/15/06 |
|
| Making a gradual curve to the south along White Oak Bayou, IH 10 (Katy Freeway) converges with IH 45 (North Freeway) at back to back directional T interchanges (Exits 768A/B). 01/15/06 |
|
| Left Exit 768A departs IH 10 east for IH 45 north to Spring, The Woodlands, Conroe and other north Houston suburbs. 01/15/06 |
|
| Left Exit 768B comprises a slip ramp onto the adjacent IH 45 southbound mainline leading to Downtown Houston. IH 10 and IH 45 do not formally overlap along the ensuing stretch. 01/15/06 |
|
| Exit 769A departs from the outside lane of IH 10 to Smith Street south at the Theater District. 08/08/06 |
|
| Smith Street extends southwest from the off-ramp at Exit 769A through Downtown Houston. 08/08/06 |
Page Updated 07-23-2019.


 East
East